
AdvanceAmayaBrotherEMTHappyJapanMelcoSWFTajimaToyota
Advance
Amaya
Brother
EMT
HappyJapan
Melco
SWF
Tajima
Toyota
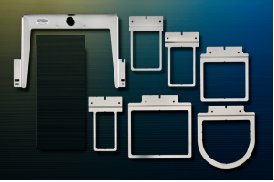
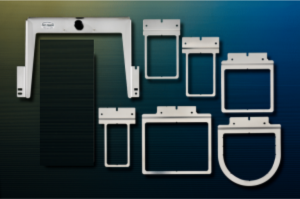
Fast Frames 6in1
Firstly, backing stick on is placed on the underside of the frame. Secondly, the adhesive backing is placed in the open sew space of the frame. Thirdly, and most importantly, that press the area to be sewn firmly down on the backing. (Using the notches as line up points for alignment) however any area that will lay down flat in the sew field you can sew embroidery on.
After that, use it for sweat band area of caps, back, sides, bill, bucket caps, collar tips, cuffs of sleeves, dog collars, gym bag center flaps, etc.
Sports fabric in jersey does not get out of shape. Because backing stick on keep it in place. The conclusion, this is much faster, more effective and cost low cost to sewing on.
Don’t worry you won’t waste a lot of backing. When you tear the ready item away, then place a patch on the old embroidery hole from the underside. Then you are ready to press the new item in place to sew a new embroidery – this is well thought out.
The difference between Fast Frames 6in1 and 7in1 is the size af the arm. Frames 6 in 1 arm is shorter than the 7 in 1 arm and the embroidery field is bigger and that can be an advantage.
General Instructions for using Fast Frames
- Above all, Lay backing under the frame, and cut backing slightly wider than the frame 3/8″ to 1/2″ all around. You can using the frame as your gauge, your backing will fit the frame correctly each time.
- Turn the frame upside down. Peel the paper from the backing. Place the backing on the frame. Be sure to allow backing to extend past the sides and bottom of the frame. Fold the excess backing over the front edge of the frame.
- Attach the frame to the machine arms just as you would one of your hoops. The opening of the frame (with the backing attached) should be coming toward you. Trace your design for proper location. Be sure to leave enough room that the pressure foot does not pinch the garment on the inner edge of the frame.
- and last, remove the frame from the embroidery machine, place the item on the backing. Smooth the fabric on the adhesive backing. Places frame on the machine and make the embroider.
Fast Frames 6in1 frame will work with many different machines, when you upgrade or change machines, often all you need to get up and going again is a new exchange arm. – CLEVERLY thought out.
Different embroidery frames here.